

June 21, 2018
Oven Repair
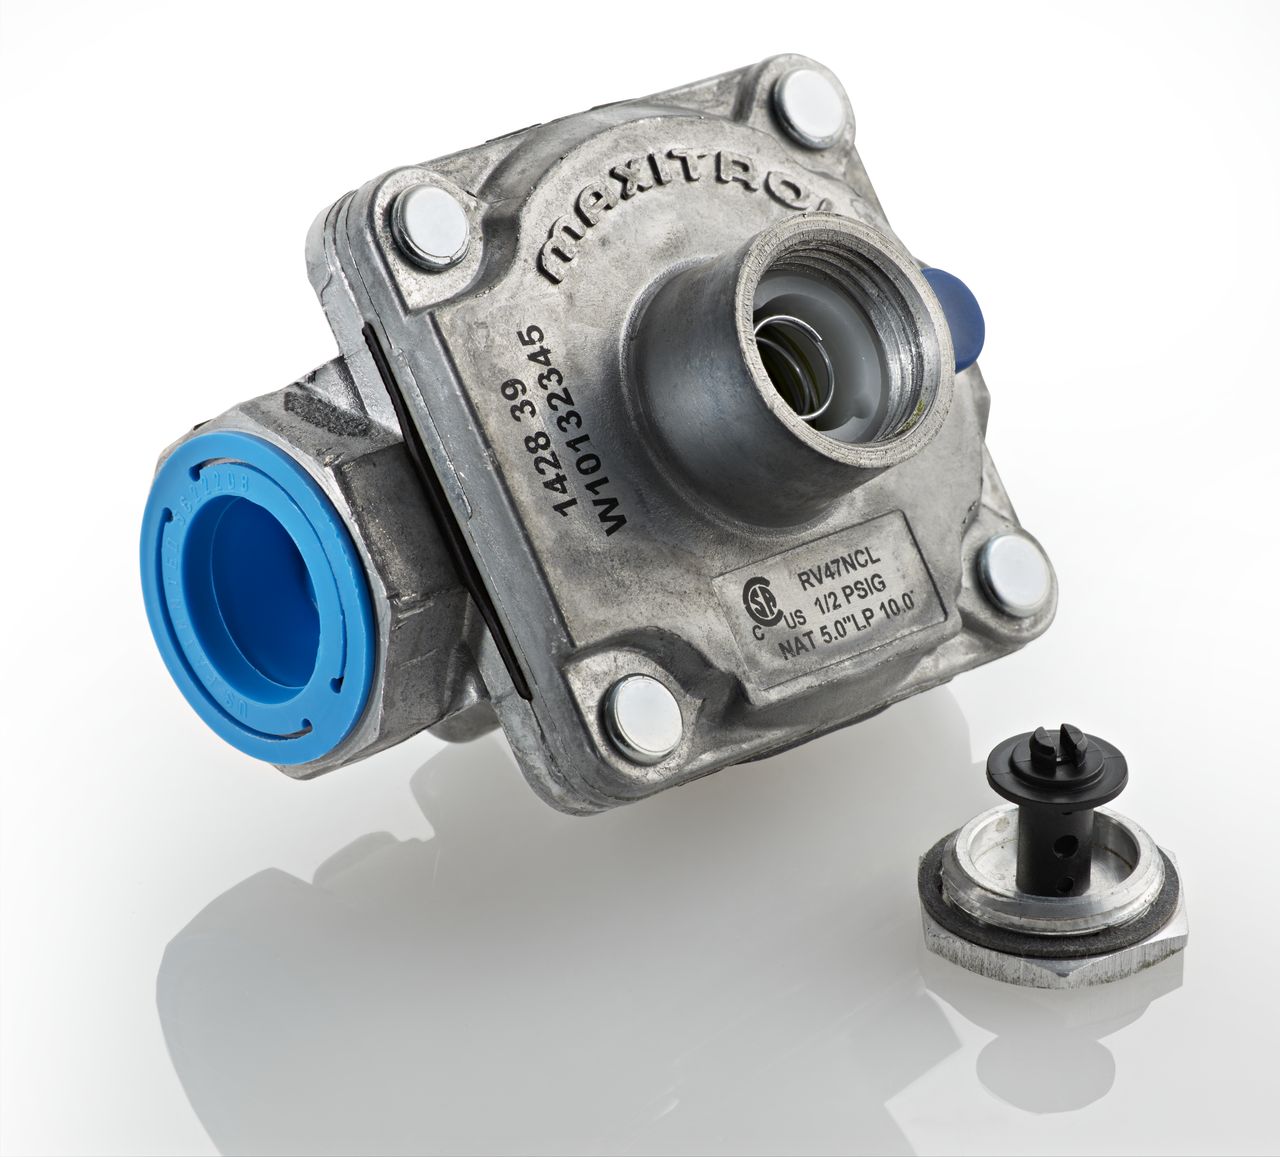
When you have a cooktop that won’t turn on, a lot of parts could be at fault. But when it’s a gas cooktop, one of the most likely problems is a faulty pressure regulator. Order part #W11087445 for Whirlpool gas cooktops. Then follow these steps to replace the part.
1. Unplug the appliance and turn off the gas connection.
Unplugging an appliance, or removing its power source, is a standard step for all appliance repairs. Whenever you are repairing a gas appliance, also make sure the supply line is turned off before disconnecting any other parts.
2. Remove the regulator under the countertop.
First, remove the gas supply line from the bottom of the regulator. The regulator can shift as you’re unthreading the gas supply, so hold it in place with a separate pair of pliers. Then start loosening the pressure regulator from the connection point at the underside of the cooktop, or the manifold. Remove it carefully and set it aside.
3. Install the new pressure regulator.
The part has standard connection points, which may not be the right fit for your gas cooktop. Find the adapter in your old regulator and remove it. Add pipe joint compound before connecting it to the new regulator. Tighten it for a snug fit.
If your cooktop uses liquid propane, you may need to make additional adjustments, such as reversing the spring retainer.
Then add more pipe joint compound to the manifold thread and connect the pressure regulator. Locate the image of an arrow on the pressure regulator and make sure it’s pointing up. This ensures your regulator has the correct orientation; the adapter should be facing the bottom, too. Tighten the part completely with the access cap facing the open space of your cabinet.
4. Reassemble the gas connection.
Reconnect the gas supply line to the adapter end of the pressure regulator. It should be firmly tightened, but not as tightly as the other parts. Then turn on the gas To make sure you have no leaks, apply a leak detecting liquid around the joints. If it doesn’t bubble, then you have no leaks.
Whenever you’re working with gas appliances, this should be a standard step as you’re finishing up with repairs. Only plug the appliance back in once you have proof there are no leaks.
For more repair procedures and tips for troubleshooting broken appliances, go to Twin Cities Appliance Service.

Apr. 09, 2024
How to Fix the Whirlpool Washer F5 E3 Error Code
Mar. 06, 2024
10 Steps to Clean Your Fridge Water Dispenser

Feb. 05, 2024
How to Replace a Whirlpool Refrigerator Water Filter
Jan. 03, 2024
How to Clean an Oven Glass Door (3 Easy Methods)
Dec. 11, 2023
Why Your Microwave Plate Is Not Spinning
Nov. 06, 2023
Washer Spin Cycle Not Working? Here’s Why

Oct. 02, 2023
How to Fix a Slow Ice Maker
Sep. 08, 2023
Why Does My Dishwasher Smell like Sewage?
Jul. 31, 2023
What Causes a Dryer to Overheat? (and How to Fix It)
Jul. 19, 2023